I am, and have been, an admirer of Andrea Held’s conferences, both IT Tage in Frankfurt in December, and more recently its online edition, Thementage Remote. I had the great privilege to be part of both of them.
This article consists of 2 parts:
- Part 1: https://martincarstenbach.com/2025/06/25/thementage-2025-ci-cd-demo-part-1/
- Part 2: https://martincarstenbach.com/2025/06/26/thementage-2025-ci-cd-demo-part-2/
My most recent presentation was yesterday, where I demonstrated how to use Continuous Integration/Continuous Delivery in the context of relational databases. More specifically, how to use the SQLcl project command to create and move an APEX app from development to production.
I spend a lot of time and effort creating the demo, and I think it’s not too bad so I’ll share it here with you. It’s a bit of a long read, but I didn’t just want to throw the commands out here but add a few lines of explanation what’s happening.
This is the first part, the second one shows you how do deal with version 2 of the app. Let’s start by creating the base release.
This is a quick summary of the SQLcl projects workflow:
- Local development (maybe using a container instance on your laptop)
- Export of relevant schema objects to generate the target state
- Staging the changes in preparation for a deployment. This step is crucial because it automatically creates a diff, or delta, to get from target state (your development environment) to the state right now
- Crafting a release
- Generating a deployable artifact
Let’s have a closer look.
Prerequisites
You need an Oracle Database 23ai Free instance, and you need the new Oracle REST Data Services. I used the following components:
- Oracle Database Free 23.8/Linux x86-64 downloaded from Oracle’s container registry
- ORDS 25.1 images, also from Oracle’s container registry
- Podman 5.4.0, as shipping with Oracle Linux 9.6/x86-64
- Oracle SQLDeveloper Command-Line (SQLcl) version: 25.1.1.0 build: 25.1.1.120.1002
The complete demo can be found on my GitHub. The easiest way to follow along is to clone it into a directory of your choice.
You can use setup/01_apex.sh to create an APEX environment if you don’t have one already. As always with this type of exercise, make sure you read and understand the script before running it! Amend the sections as needed for your environment. The script isn’t meant for anything except a runtime for this demo. Do NOT use it for anything serious ,it’s too insecure for anything but a playground.
The remainder of this article assumes you have a working APEX environment.
Demo
The demo is very, very basic, but nevertheless hopefully complex enough to bring the points across. If you’re not familiar with SQLcl’s project command, please consult the docs as well as this post.
APEX Setup
Once ORDS is up and running it’s time to create 2 (APEX) workspaces:
- DEMO_WS is owned by DEMO_WS_OWNER and represents the development environment
- PROD_WS, owned by PROD_WS_OWNER represents the production environment
Using SQLcl, connect to freepdb1 as SYSDBA and run setup/02_workspaces.sql. Before you do, amend the passwords if necessary.
Developing the APEX application
Using SQLcl, connect to freepdb1 as DEMO_WS_OWNER and create the application’s sole table using setup/03_todos.sql.
View the script first – notice how the priority column is of type NUMBER(1) – and it only accepts 1, 2, or 3. That’s far from ideal because you don’t know what the numbers indicate. The application will be changed later, but for now let’s go with that.
With the table created, connect to the APEX development environment as DEMO_WS as DEMO_WS_ADMIN and create the application. Select App Builder -> Import. In the ensuing dialog select setup/04_f100.sql as the source and import it. Keep all the defaults.
Once the application is imported, you can play around with it for a bit. Maybe you want to create a single todo item:
- description: prepare for deployment to production
- priority: 1
- done: f
That’s it for now. Let’s use SQLcl project workdflow to subject the application to version control (Git), and deploy it to production. SQLcl project is an opinionated framework how things should be done. It’s based on a clever directory structure, and Liquibase changelogs. The nice thing is that it abstracts that fact away from the user.
Starting the SQLcl project workflow
Still in SQLcl, connected as DEMO_WS_OWNER to freepdb1, you begin by initialising the SQLcl project. If you cloned the repository from GitHub, make sure you’re in the top level directory tt25, then run these commands
project init -directory . -name sqlcldemo -schemas demo_ws_owner
! echo setup >> .gitignore
If you didn’t clone the repository you need to initialise git using git init. Make sure you use main as your initial branch name, or else you must tell SQLcl what your production branch is. Later on SQLcl project uses the production branch (main by default) to compare your development environment’s changes to what’s live in production.
To keep the example simple, both development and production workspaces have been created in the same PDB. This isn’t very realistic – most deployments separate environments in different PDBs and/or CDBs. To cater for the slightly odd situation SQLcl project must be instructed not to emit schema names, or else deployments will fail later. This is done using the following command:
project config set -name export.setTransform.emitSchema -value false
You can use project config -list -verbose to list all the settings, their defaults and meaning.
At this stage it’s you should commit the changes to your git repository. Assuming you are still using the SQLcl session you started earlier, this can be done as follows:
! git add .
! git commit -m 'chore: initializing repository with default project files'
Creating the base release
The next step is to create the base release, up until now the only code checked into git concerned the project metadata. Begin by creating a new very-short-lived branch using:
! git checkout -b base-release
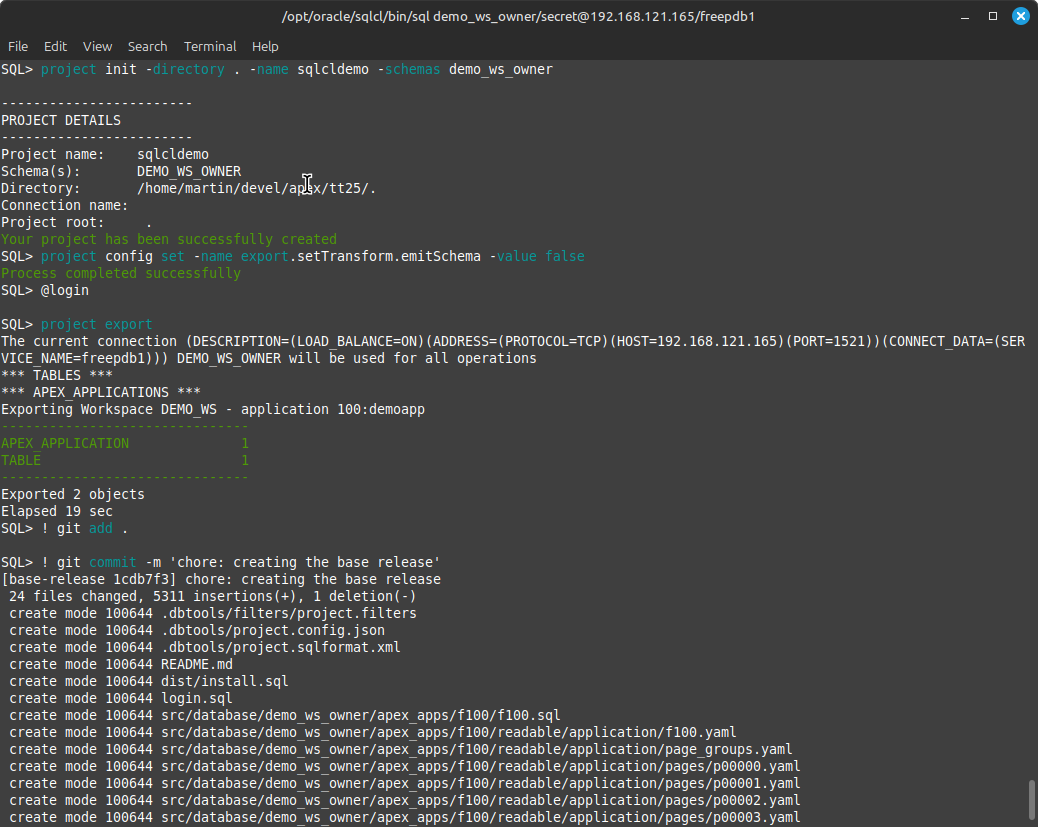
Next, export the APEX application and all schema objects found in the DEMO_WS_OWNER schema using
project export
Once the export finished, commit all files to the repository using:
! git add .
! git commit -m "chore: creating the base release"
You can see the result in the following screenshot:
The project export command exported everything found in the schema into the src directory. The next step is to stage the files and to create the first release, version 1.0. Do so by executing:
project stage -verbose
project release -version 1.0 -verbose
As part of the project stage command, SQLcl performs a diff between what’s committed against the main branch with and the base-release. Anything that’s missing in main will be created, and delta files are generated for things that need changing. Since main is devoid of database objects at this time (it’s version 1 of the app), everything from src is moved to dist. This is what it looks like from a file system’s perspective.
martin@devbox ~/devel/apex/tt25 base-release ± tree
.
├── dist
│ ├── install.sql
│ ├── releases
│ │ ├── 1.0
│ │ │ ├── changes
│ │ │ │ └── base-release
│ │ │ │ ├── _custom
│ │ │ │ ├── demo_ws_owner
│ │ │ │ │ └── tables
│ │ │ │ │ └── todos.sql
│ │ │ │ └── stage.changelog.xml
│ │ │ └── release.changelog.xml
│ │ ├── apex
│ │ │ ├── apex.changelog.xml
│ │ │ └── f100
│ │ │ ├── f100.sql
│ │ │ └── f100.xml
│ │ ├── main.changelog.xml
│ │ └── next
│ │ └── release.changelog.xml
│ └── utils
│ ├── prechecks.sql
│ └── recompile.sql
├── LICENSE
├── login.sql
├── Readme.md
├── README.md
├── setup
│ ├── 01_apex.sh
│ ├── 02_workspaces.sql
│ ├── 03_todos.sql
│ └── 04_f100.sql
└── src
└── database
└── demo_ws_owner
├── apex_apps
│ └── f100
│ ├── f100.sql
│ └── readable
│ └── application
│ ├── f100.yaml
│ ├── page_groups.yaml
.. more files skipped.
└── tables
└── todos.sql
25 directories, 36 files
Also notice how the Liquibase changelogs are created and how they are linked:
martin@devbox ~/devel/apex/tt25 base-release ± cat dist/releases/main.changelog.xml
<?xml version="1.0" encoding="UTF-8"?>
<databaseChangeLog xmlns:xsi="http://www.w3.org/2001/XMLSchema-instance"
xmlns="http://www.liquibase.org/xml/ns/dbchangelog"
xsi:schemaLocation="http://www.liquibase.org/xml/ns/dbchangelog
http://www.liquibase.org/xml/ns/dbchangelog/dbchangelog-4.3.xsd">
<include file="1.0/release.changelog.xml" relativeToChangelogFile="true"/>
<include file="apex/apex.changelog.xml" relativeToChangelogFile="true"/>
<include file="next/release.changelog.xml" relativeToChangelogFile="true"/>
</databaseChangeLog>
One of the great advantages of SQLcl projects over your home-grown approach is the management of the directory structure and Liquibase changelogs.
SQLcl project offers the gen-artifact command to create a zipfile containing everything needed to deploy the application.
Before the artifact can be created, a little workaround must be applied due to the fact that both development and production workspaces share the same PDB. Without the workaround you’d encounter an ORA-20987: APEX – Invalid workspace ID. – Contact your application administrator during the deployment error. This workaround is based on Neil Fernandez blog post.
Update: SQLcl allows you to define the location of your properties file at runtime dynamically. See Neil’s post for more details.
Create a new file in dist/utils/liquibase.properties with the following content, replacing 100 with the source App ID in case it’s different:
apex.100.alias = productionapp
apex.100.appId = 12345678
apex.100.workspace = PROD_WS
apex.100.schema = PROD_WS_OWNER
Then change dist/install.sql lb update command to read
lb update -log -changelog-file releases/main.changelog.xml -search-path "." -defaults-file utils/liquibase.properties
There’s one final commit to be made. Stage all files and commit using “feat: fininalised release 1.0” as the commit message.
! git add .
! git commit -m "feat: finalised release 1.0"
The base release is now complete, it’s time to merge the branch into main and prepare for the production deployment.
Deploy to production
Before the deployment to production can take place, the short lived branch must be merged into main in order to “go live”.
! git checkout main
! git merge base-release
After the merge it’s up to you to delete the base-release branch. Now that everything is in main, you can create the artifact and deploy it to the production workspace:
connect prod_ws_owner/secret@localhost:1521/freepdb1
project gen-artifact

project deploy -file artifact/sqlcldemo-1.0.zip -verbose

lb history
That’s it! You can now log into PROD_WS and check the application was created.
Summary
The initial production deployment concludes the first part of the demo. The second part shows how to work with tickets and sprints and how SQLcl projects creates a diff between what’s live and development.

You must be logged in to post a comment.